🛠️ Updated:
Table of Contents
🧭 Introduction
In this guide, we’ll walk you through setting up and hosting a modded Minecraft server on Amazon Web Services (AWS).
By leveraging AWS’s powerful cloud infrastructure, you can build a custom gaming experience with improved scalability, reliability, and control—perfect for both small friend groups and larger communities.
Whether you’re diving into Pixelmon or another epic modpack, we’ll show you how to:
- Upload and manage server files using S3
- Spin up a powerful EC2 instance to run your server
- Secure it with IAM roles and firewall settings
- Monitor performance and prepare for cost optimization
- Automate backups and implement live server stats (coming in Part 2)
By the end, you’ll have a fully functional, modded Minecraft server running in the cloud—on your terms. ⚡
📚 What You’ll Learn
This tutorial covers:
✅ Installing a mod loader and modpack via CurseForge
✅ Organizing and uploading server files using AWS S3
✅ Launching and connecting to an EC2 instance
✅ Setting up SSH, EC2 Instance Connect, and security groups
✅ Laying the groundwork for automation, backups, and optimization
Let’s get started! 🚀

⚙️ Prequisites
Before diving into AWS, let’s make sure your local tools are set up properly.

✅ What You’ll Need
- Minecraft: Java Edition installed
- The standalone CurseForge desktop app (⚠️ not the Overwolf version)
🧩 Why CurseForge?
CurseForge is the preferred launcher for managing Minecraft modpacks. It simplifies the install process and ensures you and your friends are using identical mod versions—which is critical when connecting to a shared server.
For this guide, we’ll be using:
🎯 Modpack: The Pixelmon Modpack
📦 Version: 9.1.13
But you can choose a different modpack—this guide works for most modded servers that provide server packs.
📌 Important: Use the standalone CurseForge app.
Do not use the Overwolf version—we won’t cover it here.
📥 Download Your Modpack’s Server Files
Once your modpack is installed, you’ll need its server files:
- Open the CurseForge app
- Locate your chosen modpack
- Click “Install” to install it locally
- Then, click the “Download Server Pack” link (usually next to the install button)
- Save the
.zipfile—we’ll upload this to AWS later
💡 Pro Tip: Keep your server files organized and ready to upload to Amazon S3, which we’ll cover in the next section.

🗂️ Setting Up an AWS S3 Bucket
With your modpack’s server files downloaded, it’s time to create a centralized storage bucket to house them. Think of S3 as a cloud-based filing cabinet where your EC2 instance will later fetch everything it needs
☁️ Why Use Amazon S3 for Your Modded Minecraft Server?
Amazon S3 (Simple Storage Service) is a powerful, secure, and scalable way to manage your Minecraft server files—especially modpacks and config files.
Here’s why it’s a great fit:
✅ Scalable storage – Perfect for large modpacks, frequent updates, and future expansion
✅ Easy integration – Your EC2 server can pull files directly during setup or on boot
✅ Built-in security – Configure permissions to keep your files safe from unwanted access
🚀 Getting Started with Amazon S3
🚨 Important Note: Amazon S3 is not included in the AWS Free Tier for this use case (especially for larger modpacks). Be sure to monitor your storage usage and data transfer to avoid unexpected charges.


Before we begin, make sure you have an AWS account ready. If not:
- Create an AWS account
- Log in to the AWS Management Console
- In the top search bar, type “S3” and select Amazon S3
💡 Quick Tip: Upload only the essential server files, such as .jar files, configs, mods, and world saves. We’ll retrieve them using a script in your EC2 instance later.
📦 Creating Your S3 Bucket
Now that you’re inside the Amazon S3 dashboard, it’s time to spin up your bucket—the cloud container where you’ll store all your modded Minecraft server files.
- Click the
Create bucketbutton in the top right. - Enter a globally unique name for your bucket.
Example:trubytes-s3-minecraft-server 📌 If the name is already taken, try adding your initials, a random number, or a short server tag to make it unique.
- For this tutorial, you can leave the default settings as-is.
(No need to configure advanced options like versioning or encryption unless you’re experienced.) - Scroll down and click
Create bucketat the bottom.
🎉 Success!
Congrats—your S3 bucket is live and ready to host your modpack files. We’ll upload your server files here shortly and configure access in the EC2 setup.

🔓Unzip the Server Package
Before uploading to S3, you’ll need to extract the contents of your server pack.
- Locate the server pack you downloaded via CurseForge.
- Unzip the archive using your preferred extraction tool (Windows Explorer, WinRAR, 7-Zip, etc.).
- Inside, you’ll see a folder filled with important files:
.jar files (like forge-x.x.x-universal.jar)
Configuration files
Mod folders
Start scripts
✏️ Note: These files are what your EC2 instance will use to launch your server later.
☁️ Upload to S3
- Go to your S3 bucket in the AWS Console.
- Click
Upload. - Drag and drop all the unzipped contents (not the zip file itself!) into the upload window.
- Click
Uploadagain to begin transferring the files to the cloud.

✏️ Note: Depending on your connection, this may take a minute or two. Once complete, your S3 bucket will be ready to serve the files during EC2 setup.
🖥️ Selecting the AMI and Instance Type for EC2
Now that your files are ready, it’s time to set up the virtual machine that will host your Minecraft server—an Amazon EC2 instance.
🏞️ Select an AMI (Amazon Machine Image)
The Amazon Machine Image (AMI) is the foundation for your EC2 instance. For this setup, we’ll use Amazon Linux 2, which is:
✅ Optimized for AWS
✅ Lightweight and fast
✅ Regularly updated and secure
🖧 Choose an Instance Type
Next, you’ll select the instance type—the virtual hardware your server will run on. For most Minecraft modpacks, a t2.medium instance should be sufficient:
🔹 t2.medium – 2 vCPUs + 4 GiB RAM (ideal for most servers)
However, if you anticipate a larger player base or are running a resource-heavy modpack, consider upgrading to a more powerful instance:
🔸 t3.large – 2 vCPUs + 8 GiB RAM
🔸 t3.xlarge – 4 vCPUs + 16 GiB RAM
If you’d like to review the size options for t2 instances, you can check them out here
💡 Tip: You can always scale up later if your server requires more resources. AWS makes it easy to adjust your instance type as your needs grow.
🏷️ Naming Your Resources
Staying organized is key! When naming your AWS resources, try to follow a consistent naming convention:
EC2 Instance Name: insertnamec2–minecraft-server
S3 Bucket Name: insertbucketname-s3-minecraft-server
If any names are already taken, you can simply add a number or a unique tag (e.g., -001 or -yourname) to keep things organized.

🔒 Configuring Security Roles for Your EC2 Instance
To ensure your Minecraft server is both accessible and secure, you’ll need to configure security roles that control who can connect to your EC2 instance.
🖥️ Allow SSH Access (Optional)
If you plan to manage your server remotely via SSH, you’ll need to allow SSH access from your local machine. This is especially useful if you need to troubleshoot or adjust server settings.
Why Enable SSH?
Allows you to connect remotely to your server.
Gives you the ability to troubleshoot issues and make server adjustments.
⚠️ Security Tip: Restrict SSH access to only your own IP address, rather than allowing open access (0.0.0.0/0). This adds an extra layer of protection.
🌐 Enable Public Access for Minecraft
To allow players to connect to your Minecraft server, you’ll need to open the required port:
✅ Port 25565 (Minecraft’s default port) – This allows multiplayer connections over the internet.
✅ Source: Anywhere (0.0.0.0/0) – This enables players from any location to join your server.
⚠️ Security Tip: If you only want specific players to join, you can restrict access to specific IP ranges instead of making it fully public. This ensures your server is more secure while still being accessible.
🛡️ Create a New Security Group
- Navigate to the AWS EC2 Dashboard.
- In the left menu, go to Security Groups (under Network & Security).
- Click Create Security Group and give it a recognizable name, such as: Minecraft-Server-SG
🔐 Configuring Security Groups for Your EC2 Instance
To control access to your Minecraft server, you’ll need to create a Security Group with specific rules for SSH access and multiplayer connectivity.
⚙️ Set Up Security Rules
🚀 SSH Access (Optional – Direct Server Management)
If you plan to manage your server remotely via SSH, add the following rule:
Type: SSH
Protocol: TCP
Port Range: 22
Source: Your IP (My IP) or a trusted IP range
Purpose: Allows secure SSH access to the server (You can also manage the server via EC2 Instance Connect).
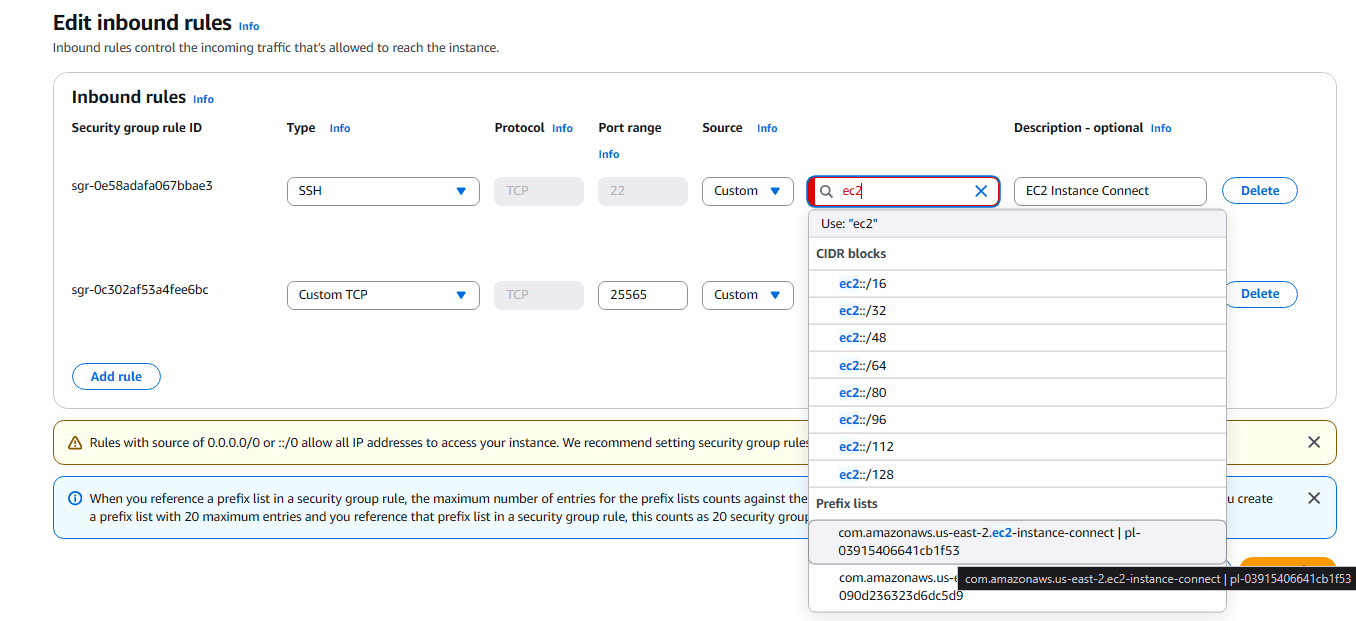
🔑 EC2 Instance Connect (Recommended – Easier Access)
For AWS-managed access without manually handling SSH keys, use EC2 Instance Connect:
Type: SSH
Protocol: TCP
Port Range: 22
Source Type: Custom
Source: Type in “EC2” and select the EC2 prefix list (non-IPv6)
Purpose: Secure, AWS-managed access to your server.
🌍 Minecraft Server Access (Public Player Connections)
To allow players to connect to your Minecraft server, add this rule:
Type: Custom TCP Rule
Protocol: TCP
Port Range: 25565 (Minecraft Default Port)
Source: 0.0.0.0/0 (Public)
Purpose: Enables players from anywhere to connect.
⚠️ Security Tip: If you want to restrict access, replace 0.0.0.0/0 with a specific IP range (e.g., your friends’ IPs) to make the server more secure.
🌐 Subnet and Public IP Assignment
Subnet: No specific subnet preference is required.
Auto-assign Public IP: Enable this setting to ensure your server gets a public IP address, allowing players to connect.


With your Security Group configured, your server is now accessible while maintaining proper security controls. Now, let’s move on to launching your EC2 instance and finalizing your Minecraft server setup! 🚀
🔑 Assigning IAM Role & Configuring Pricing
To ensure your EC2 instance has the necessary permissions to access your S3 bucket (where your mod files are stored), you’ll need to assign an IAM role to the instance. Additionally, configuring your pricing helps you keep track of your cloud costs effectively.
🛠️ Assign the IAM Instance Profile
- Navigate to the AWS EC2 Dashboard.
- Select your EC2 instance from the list.
- Click on Actions > Security > Modify IAM Role.
- Choose the IAM role you created earlier, which grants access to your S3 bucket containing the server files.
- Click Update IAM Role to apply the changes.
- This ensures that your EC2 instance has the appropriate permissions to read from your S3 bucket.
💰 Configuring Pricing
To help track and optimize your AWS costs, you can configure your pricing preferences for AWS services. This step is essential for keeping your cloud infrastructure costs in check and ensuring you stay within budget.
- Make sure your EC2 instance is set up according to the specifications you’ve selected earlier (e.g., t2.medium, t3.large).
- Consider your expected usage, and review pricing for the chosen instance type to stay aware of potential charges.
With the IAM role assigned and pricing configured, your EC2 instance now has the proper access rights. You’re now ready to launch your EC2 instance and start setting up your Minecraft server! 🚀
🛡️ Create the IAM Role
Navigate to the IAM Console
- Open the AWS IAM Console.
- In the left sidebar, click on Roles.
- Click Create Role to begin.
Select a Trusted Entity
- Under Trusted entity type, select AWS Service.
- Choose EC2 as the service that will use this role.
- Click Next to proceed.
Attach Permissions
To grant your EC2 instance access to your S3 bucket, you need to create a custom policy.
- Click Create Policy.
- Switch to the JSON tab.
- Copy and paste the following policy into the editor:
					{
	"Version": "2012-10-17",
	"Statement": [
		{
			"Sid": "Statement1",
			"Effect": "Allow",
			"Action": [
				"s3:ListBucket",
				"s3:GetObject"
			],
			"Resource": [
				"arn:aws:s3:::insertbucketname-s3-minecraft-server",
				"arn:aws:s3:::insertbucketname-s3-minecraft-server/*"
			]
		},
		{
			"Effect": "Allow",
			"Action": [
				"s3:ListBucket",
				"s3:GetObject",
				"s3:GetBucketLocation",
				"s3:PutObject",
				"s3:PutObjectAcl",
				"s3:DeleteObject"
			],
			"Resource": [
				"arn:aws:s3:::insertbucketname-s3-minecraft-server",
				"arn:aws:s3:::insertbucketname-s3-minecraft-server/*"
			]
		}
	]
}
📌 Note: Replace “insertbucketname-s3-minecraft-server” with the actual ARN of your S3 bucket.
📝 Creating and Assigning Policies
- Click Review Policy.
- Give the policy a name, for example, MinecraftS3AccessPolicy.
- Click Create Policy.
Attach the Policy to the Role
- Back in the Create Role process, attach the policy you just created to the role.
- Review the role’s settings, then click Next.
Finalize and Attach the Role
- Give the role a name, such as insertrolename-ec2-role.
- Complete the role creation process by clicking Create Role.
✏️ Note: Once the IAM role is created, you’ll attach it to your EC2 instance when you launch it. This ensures that your instance has the appropriate permissions to access your S3 bucket.
📜 Setting Up User-Data for Your EC2 Instance
To ensure your EC2 instance automatically downloads the necessary server files from your S3 bucket, accepts the EULA, and runs the Minecraft server configuration upon launch, we’ll use user-data scripts. This script will handle all tasks automatically, allowing your server to run without manual intervention.
Additionally, we will associate an Elastic IP with your EC2 instance to ensure the public IP remains static and always linked to your server after launch.
Create the User-Data Script
The user-data script is a shell script that runs automatically when your EC2 instance is launched. This script will:
- Download the necessary files from your S3 bucket.
- Set the EULA to true, agreeing to the Minecraft End User License Agreement.
- Run the Minecraft server with the correct configurations.
- Here’s an example of the user-data script you’ll need to use:
					#!/bin/bash

# Exit on any error
set -e

# Variables
BUCKET_NAME="insertbucketname-s3-minecraft-server"
SERVER_DIR="/home/ec2-user/minecraft-server"
MODS_DIR="$SERVER_DIR/mods"

# Update and install dependencies
sudo yum update -y
sudo yum install -y java-1.8.0-amazon-corretto aws-cli

# Verify Java installation
echo "Java version:"
java -version

# Create server directory
sudo mkdir -p "$SERVER_DIR"
sudo chown ec2-user:ec2-user "$SERVER_DIR"
cd "$SERVER_DIR"

# Pull server files from S3
echo "Syncing server files from S3..."
aws s3 sync "s3://$BUCKET_NAME/serverpack9113/" .

# Ensure install.sh is executable and run it
if [ -f Install.sh ]; then
  echo "Making Install.sh executable..."
  chmod +x Install.sh

  echo "Running Install.sh..."
  ./Install.sh
  echo "Install.sh completed."
else
  echo "Install.sh not found. Skipping."
fi

# Run Forge once to generate eula.txt
echo "Starting Forge server once to generate eula.txt..."
sudo java -Xmx4G -Xms2G -jar forge-1.16.5-36.2.35.jar nogui || true

# Accept the EULA
if [ -f eula.txt ]; then
  echo "Accepting EULA..."
  sed -i 's/eula=false/eula=true/' eula.txt
else
  echo "eula.txt not found. Initial run may have failed."
  exit 1
fi

# Start the server for real
echo "Starting Minecraft Forge server..."
sudo java -Xmx4G -Xms2G -jar forge-1.16.5-36.2.35.jar nogui

# Optional: run ServerStart.sh if desired
# if [ -f ServerStart.sh ]; then
#   echo "Making ServerStart.sh executable..."
#   chmod +x ServerStart.sh
#   echo "Running ServerStart.sh..."
#   ./ServerStart.sh
# else
#   echo "ServerStart.sh not found. Skipping."
# fi
📝 Explanation of the Script
- Update the Instance and Install Java: This step ensures your EC2 instance is up to date and has Java installed, which is required to run the Minecraft server.
- Download Server Files from S3: The script uses AWS CLI to pull the server files from your S3 bucket and stores them in the
/home/ec2-user/minecraftdirectory. - Accept the EULA: The script automatically sets the
eula.txtfile to true, which is required to run the server and agrees to the Minecraft End User License Agreement. - Run the Minecraft Server: Finally, the script runs the Minecraft server with the allocated memory settings (
-Xmx4G -Xms2G), which ensures it starts up and operates smoothly.
🌐 Associate an Elastic IP
After setting up your user-data script, associate an Elastic IP with your EC2 instance to ensure the public IP remains static. This ensures that the IP address stays consistent, even if the instance is stopped and restarted.
⬇️
In my testing, the full startup process—from powering on the instance to having the server fully online—took about 2.3 minutes. This includes:
- Pulling the files from the S3 bucket.
- Generating the necessary configuration folders.
- Starting the Minecraft server itself.
You can monitor the progress via the EC2 Instance Console Logs or by connecting through EC2 Instance Connect to check in real-time.
🎮 Sharing Your Server with Friends


Once your Elastic IP is set up and your server is running, sharing your server with friends is easy!
Simply provide them with your Elastic IP. As long as they’re using the CurseForge launcher with the same modpack, they’ll be able to:
- Add your server IP.
- Connect directly to your server—no extra steps needed
⚠️ Heads Up: Anyone who has your server’s IP address will technically be able to join. If you want to restrict access and limit who can connect, consider setting up a whitelist or firewall rules to block unauthorized players.
📌 Part Two: Automating Deployments with Terraform
We’ll focus on setting up live server stats for real-time monitoring of your Minecraft server, and we’ll walk through using Infrastructure as Code (IaC) to deploy faster and more efficiently with Terraform.
(No cost optimization or backup strategies in this one — we’re keeping it tight and focused.)
Stay tuned—I’ll be sharing that update in the near future!
📚 Official Amazon Minecraft Server Tutorial
If you’d like to explore Amazon’s official tutorial for setting up a Minecraft server, you can find it here!
⚠️ Disclaimer
This guide is intended solely for educational purposes. It is not sponsored or affiliated with any third-party platforms, companies, or mod developers, including Pixelmon or Mojang. I do not promote or endorse any specific Minecraft mod or service provider. All content shared here is based on personal experience and is meant to help others learn how to automate server deployment using AWS tools.